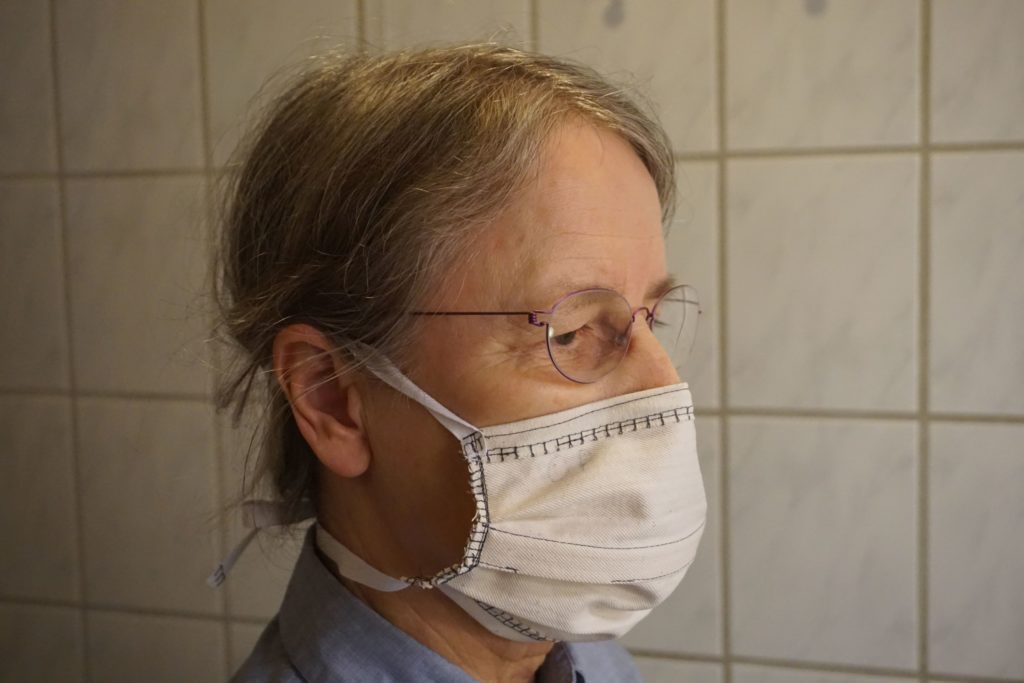
The mouthpiece / face mask and glasses belong together. They supplement the rule of keeping a distance of at least 2 m from other people. This mask is not safety approved, but consider it as an additional, small barrier more between you and others.
Preferably sew more face masks, so that you can often change to a clean face mask.
The mouthpiece / face mask is useful if you need to go outside the home during this time of coronary crisis (COVID-19) to shop for food and thus feel the need to put on a mask, but if you wear a mask to protect against infection, you also need glasses. The glasses must have glasses of some size. The glasses should protect against getting contamination in the eyes. Infectious drops, which come into the eyes, are brought with the tear fluid via the tear channel to the nose, from which it can be sniffed further into the airways or swallowed to the gastrointestinal tract/ the stomach and intestine.
The mask can also be used inside the household if one is to protect one another.
The mask and glasses can keep you from touching the critical places on your face – you are just reminded to keep your fingers away. The mask and glasses do not totally protect against infection but should be considered an emergency measure, which is better than no protection, when you handle it in a correct manner. The mask and the glasses must not be used as an alternative to staying home, if you just want to go out and have no legal purpose for going out. Once the mask has been dampened by your breath, change it. The moisture reduces the protective effect of the mask as the moisture draws droplets of infection through the fabric.
Have a pan/pot standing ready to put the mask in, when the mask needs to be changed.
When removing the mask, consider the mask as impure/contaminated on the outside, then remove the stays/stiffeners, place the mask in a pot/pan. Wash hands and stays/stiffeners. Pour water and possibly detergent/washing-powder in the pot/pan and bring it to boil. Let it cook for 2 minutes, which is best. In case of lack of time – and you have enough masks – you can put the mask, for example in a bucket and wait 3 days to touch the mask, then the virus should be dead, and you can wash the mask together with other laundry at for example a 40 ° C wash. Wash the masks in a bag, for example a pillowcase/cushion cover closed with a string or a piece of elastic – so the bands/straps will not get so much tangled up.
So think hygienically all the time. A hygienic chain is not stronger than the weakest link.
Other uses of the mask.
The mask can also be used for light dusting work, or if you have a slight cold and need to get out among others and thus protect others from infection. But if you have an infection, think about the above hygiene advice.
If you have pollen allergy, you can try if the masks also help a little on that problem, but there it is equally important to remember glasses.
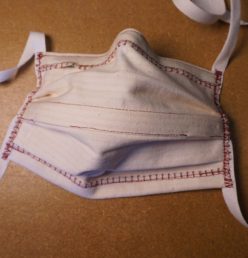
This face mask is made from a model, that I think fits well.
The mask is deliberately not a perfect piece of house work/craft with a nice look. Everyone who has the opportunity and desire should feel that it should not be a boast, but a utility thing that you make as solidly as you can.
Seams are located on the outside, so they do not bother the facial skin. If you have the opportunity and desire, you can play with colors, etc. , but the most important thing is that the mask works well.
The sewing instructions can be downloaded as a PDF here.
Photos / videos
SEWING INSTRUCTION
Work drawing / diagram. There is work drawing on the first picture with few measures. For each point in the process, dimensions are added to the working drawing
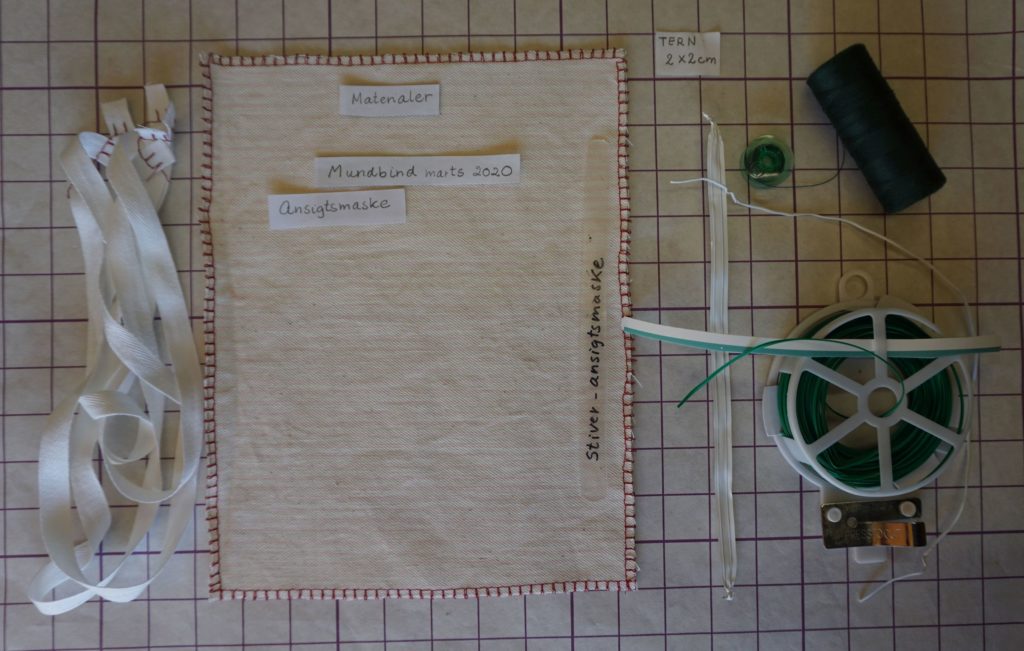
Materials: See picture and read:
Cotton fabric, dense and slightly heavy, possibly very dense, thin and rigid. 23 x 18 cm. Must be able to withstand washing at a minimum of 80 ° C.
The pattern can be downloaded here.
Bands/tape to bind with. The easiest way is to use 2 pieces of tapes of 90 cm, ie. a total of 180 cm per mask.
If you only want to sew ribbons into the corners, use 2 pieces of approx. 43 cm and 2 pieces approx. 38.5 cm ie total per mask: 161 cm.
Cotton ribbons are good, but if you have no ribbons, you can sew ribbons together, or you can sew ribbons of fabric strips. Possibly knit or crochet the ribbons. For the materials, they must be comfortable to wear against the skin. Must be able to withstand a minimum of 80 ° C in washing.
Sewing thread. Preferably in contrast color, it is easier to see when sewing.
Plastic coated binder for running across the nose. Alternatively, you can try with an electrical wire/lead, but it must be able to hold the shape. I have used the type of steel wire, which is in a flat strip of plastic. Length from side to side approx. 16.5 cm. Be careful not to have prickly ends that can go through the fabric and injure you. I folded the plastic coated double and folded the 2 cut ends 1 cm. See what you have, for example to close bags with or to hold plants in place with.
Stiffeners to middle of mask. Should keep the mask out from the face and be a bit pliable. I used some plastic packaging from dairy food, that can be cut with a strong and sharp scissors. An empty can of vinegar, or liquid, Greek yougurt, or other can be cut into strips approx. 16 cm long and 3 – 4 mm wide. Electrician Strips? Someone may have sewn some clothes with stiffeners in. Think creatively! Test the strip in the casing (channel for the stiffener) before determining the length.
Tools: Sewing machine, pin, pencil, ruler and preferably a drawing triangle. Scissors, possibly sharp kitchen scissors for cutting flexible stiffener. Possibly a pliers/nippers to cut plastic-coated binder wire with. It will be very good to have flatirons and ironing board.
WORKFLOW:
Cut the fabric 18 x 23 cm.
“Zig-zag” VVVVVV the edge all the way around the fabric.
Bands/tape/ties: “zig-zag” the ends.
See pattern / work drawing / diagram and pictures/videos.
We are not experienced in making videos for youtube. The order is a bit strange, so I will advice you to see all of them before you sew, and it will help you to know the right order.
Iron / squeeze with the iron every time you fold. It makes the job much easier.
Mark “UP” on both sides of the fabric. (In danish ”OP”)
Fold the wrong side against the wrong side in the line 9.4 cm from the upper edge. Sew / stitch 1.5 cm from the fold. Iron / press the seam on the wrong side to each side, with the fold on the rightside ( RS) facing the down part at the work.
Sew / insert the fold with 2 openings along the way, but the position of the openings must be checked before sewing. Check with the selected stiffener. Then there is a casing (channel for the stiffener). See the dimensions of the pattern. See pattern / work drawing / diagram and pictures/videos.
The next points from # – # can be sewn in one workflow, but it can be difficult to see when sewing the first mouthpiece / first mask.
#
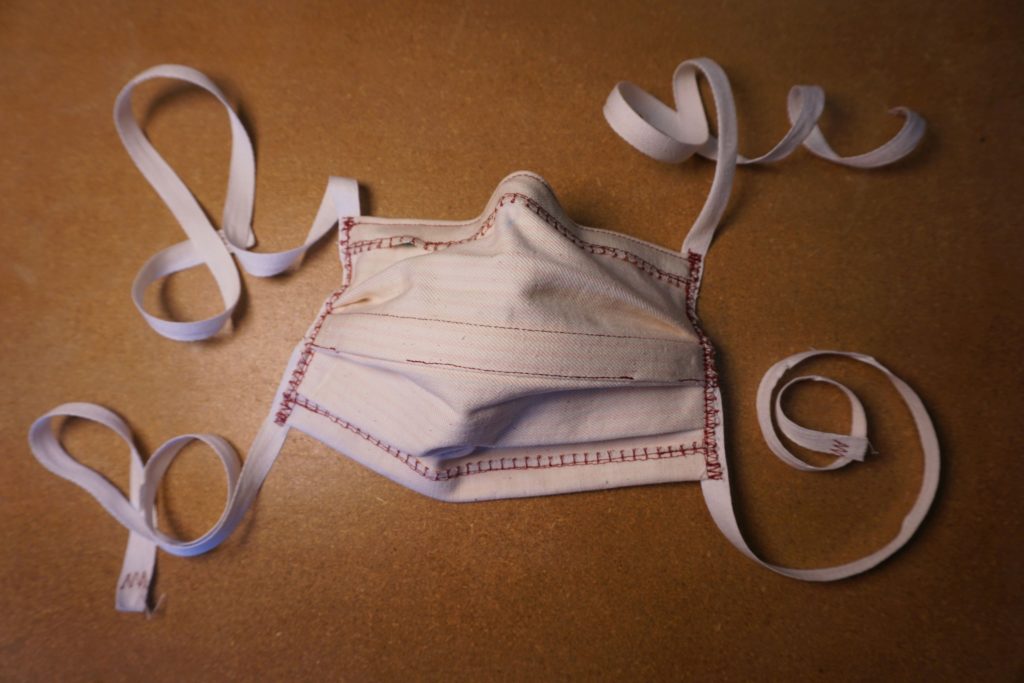
Fold the upper edge 1.5 cm down on the outside right to right. Iron. Sew / stitch 3 – 4 mm from the fold so there is some stiffness in the fold. Mark openings for the upper stiffener – see dimensions on the pattern. Sew / stitch again and you have the upper casing (channel for the stiffener) – see pictures.
Fold the bottom edge towards right 1.5 cm up on the outside. Iron. Sew / stitch – see picture.
Mark the edges of folds / pleats. See the dimensions on the pattern /diagram. Begin by folding on each side of the casing in the middle. Iron the folds /pleats along the way – it’s easier. Place needles in the edge to hold the folds / pleats. Eventually sew / stitch along the edge to hold on the folds / pleats.
Attach the 90 cm binders with 43 cm above the top edge. The bands/tapes are placed on the inside of the edges, so that the edge of the bands goes 2 – 3 mm outside the edge of the mask. It is to keep the threads away from the face. This length of the tape gives approx. 9 cm to the mask and about 38 cm ribbon from the bottom of the mask. Sew from the upper corner and across the folds / pleats to the lower corner. Sewing technically I have used the three-zig-zag at the top here, further with the regular zig-zag to the bottom to hold on the edge, then again the three-zig-zig-zag down, turn and straight stitch – – – – – – back. But it can be sewn with – – – – – ordinary straight stitches. See picture. #
TIPS:
When sewing multiple masks, you can sew them on assembly lines; i.e. to sew directly from one mask to the next without cutting the thread. It’s easier, it saves time and thread. (My mother learned it at Illum’s sewing room about 1945. Illum is a big warehouse in Copenhagen)
To put on the mask:
When I put on the mask, I easily fold the upper edge for approx. this shape —^— it fits over the nose. This is important for the efficiency of the mask. Place the mask on the nose. The upper bands I pull down under the cheekbones, up over the ears and down under the back of the head, where i bind a bow knot. Lower ties are tied in the neck.
Head and hair splendor/ chevelure are different from person to person, so you have to try it out.
Prepared by Birgit Krat, Denmark, March-April 2020 during the corona crisis / COVID-19.